This is a hack I’ve been meaning to get around to for a long time (in fact, I posted my intentions on a friend’s site 3.5 years ago, and it wasn’t even a new idea then!). It was brought to the top of my project list this week due to an incubation disaster last week (the thermostat in my incubator failed 2 days before a batch of eggs was due to hatch, killing all the chicks). I had also borrowed two very broody chickens from a friend, only to find that something about my chicken pens cured them instantly!
So, needing replacement chickens for our very elderly Australorps, I had to act.
The basic idea for this hack was to use a Fridgemate digital temperature controller (the same device I’ve previously used to turn a chest freezer into a super-efficient refrigerator) to accurately control the temperature of my Hovabator incubator.
The Fridgemate temperature controller (I bought mine from MashMaster for under $50) can be used to automatically switch an appliance on and off to maintain a set temperature. You plug the appliance into the Fridgemate, and the Fridgemate into the wall, and it controls the power supply to the appliance. In refrigeration mode, it will turn the appliance on when the temperature rises above the setpoint. In heating mode, it will turn the appliance on when the temperature drops below the setpoint. They’re normally used to maintain home brew at the optimum temperature for fermentation.
Hovabators are a very cheap and simple incubator. They’re really just a styrofoam box with a heating element and a thermostat. The built-in thermostat isn’t very accurate, though, and tends to drift as the room temperature varies. They’re also very fiddly to set properly.
My original plan was to set the thermostat very high, and use the Fridgemate to do the switching. But because the thermostat had now failed, I simply bypassed it so that whenever the incubator has power supplied, the heating element will be on. If you hack a device like this, make sure you clearly label it so someone doesn’t plug it in and burn it out!
In the photo below, you can see how I did this. I just cut the two wires to the thermostat (in the background, on the left) and joined them together with a BP connector.

The Fridgemate doesn’t come with a mounting box, and you have to wire it up yourself (if you’re not qualified, please get an electrician friend to do this for you!). You don’t want bare wires lying around, so you really need to mount it in some kind of case. I was looking for a suitable box at Bunnings, and chanced upon this cute little MDF craft box for a few dollars. Perfect! I cut a mounting hole in the front for the Fridgemate, and drilled holes in the rear for the power and temperature probe wires.

I also bought a cheap 3 metre extension cord while I was at Bunnings. I cut it, so I could wire the Fridgemate into the middle of it. I cut a 10 cm section out of the middle of it to give me the bridge wire I needed as well.

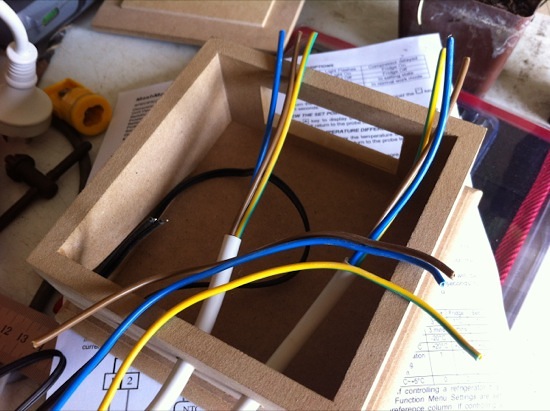
I threaded the cables through the holes and the front slot of the box, and then wired up the Fridgemate. This photo may help anyone trying to set one up. The bottom cable is the incoming power supply, and the top cable goes to the appliance. The black cable in the middle is the temperature probe.

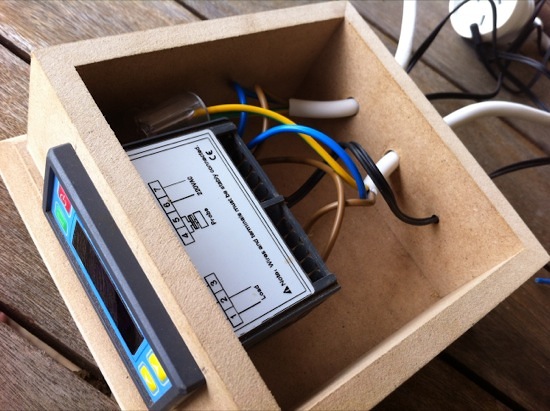
Once it was wired up and confirmed working, I pushed the Fridgemate back into its mounting hole and tidied the cables up. It’s not in this photo, but I put a tight cable tie around each power cord where they come through the holes in the box so they couldn’t be pulled out. The probe wire was very tight in its hole, so I didn’t need to do anything special with it.

Having the Fridgemate installed in a box like this is a lot safer than running it bare (please don’t do that!), and it’ll make it very easy to use for other projects as well.
Time to connect the incubator up!
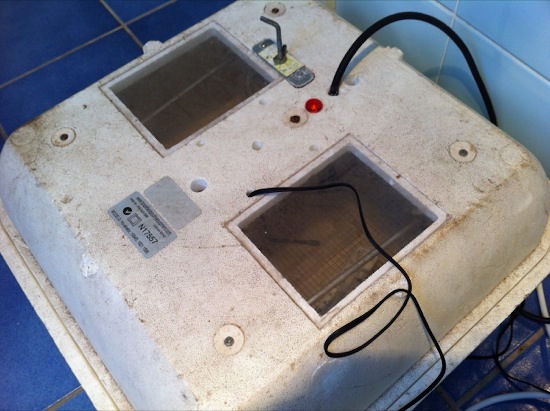
The temperature probe was inserted through one of the holes in the incubator lid. The probe itself should be positioned just at the top of the eggs, approximately in the center of the incubator (i.e. not too close to the heating element that runs around the inside of the lid).

And here’s the finished setup. I’ve only just turned it on, so the temperature is only 29 C, but the controller is working beautifully.

In case anyone else is interested in using a Fridgemate for something similar, here are the settings required:
F0 (temperature differential) = 1 C
F1 (compressor delay time) = 1 minute
F2 (min temp limit) = 0 (or anything lower than your desired setpoint)
F3 (max temp limit) = 50 (or anything higher than your desired setpoint)
F4 (operating mode) = 2 (heating)
F5 (temperature calibration) = 0 C
The setpoint is set by holding the SET button for 5 seconds, changing the displayed value with the up and down arrow buttons, then pressing and holding the SET button again for 5 seconds. It will now control the temperature to within 1 degree C of the setpoint.
Here’s a link to the full Fridgemate instructions.
Chicken eggs require an incubation temperature of 37.7 C, but because the temperature probe is located just above the tops of the eggs and the heating element is above the eggs, it’s best to go a tad higher (38 C / 100 F). The eggs themselves will then be at the correct temperature. You can only control down to the nearest whole degree with the Fridgemate anyway.
The incubator is now getting settled (it’s best to run it for at least half a day to get all the parts up to temperature before putting in eggs), and I’m going to set some eggs in it tomorrow morning. With luck, we’ll have chicks in three weeks!
Have you ever done a project similar to this? How did it go? Do you have any incubating tips to share?
Hi Darren,how are doing?I have something much the same as this to make an incubator.It is called a HERPSTAT 2,i bought them from SPIDER ROBOTICS to use on my heat mats to germinate my seeds in the Spring.I plug my heat mats into them and put the thermostats under the mats.They have 2 outlets on them so a can use 2 mats on one control both at different temperatures,they work great.They work by reducing the power going into the mats,they can control the temperature by a tenth of a degree.Yes,i have added chickens to the garden,i bought them last April and they have been laying for a month now.I took pictures of them and added them to my garden page.I have two breeds,both heritage breeds that are good for our climate.They are White Chanteclers and Buff Orpingtons,i paid $12 each for them as day old chicks.I bought 20 Chanteclers and 14 Buff Orpingtons and ended up with 17 pullets and 17 rosters out of the bunch.I found them to be a little expensive so i kept back two roosters,one of each breed,and butchered the rest.This way i can hatch my own eggs next year.I bought an incubator for $400 this year but it only hold 20 eggs.So i have decided to make my own much like yours only a bit bigger and i can run 2 off the Herpstat 2.I have been asked already by someone to hatch them some of the white one’s so it should be interesting.I won’t put the roosters with the hens until the end of February,so it will give me something to mess around with though the Winter.By the way,we had a foot of snow yesterday,our fourth snowfall of the Winter.It is -24C this morning,so it is a bit cold for anything yet.There is getting quite a market here now for free range eggs,i manage to sell all the extra eggs that i have quite easy.I have more pullets coming tomorrow,so that will boost the supply a bit.Let me know how you go on with your eggs,i will keep my eye open for your results.Cheers Bob.
@Bob: Thanks for the update! I’m always interested to hear from other people doing similar stuff to me, and it’s great to share ideas. The herpstat controller looks like it was designed for reptile keepers (herpetologists), so should be perfect for running an incubator. Much fancier than my little cheapie Fridgemate :-).
It sounds like you’re doing really well with the chickens, and got to stock your freezer with roosters as well! Chicks do seem to sell for a lot – you might make a bit of cash by value-adding your eggs, turning them into chicks :-).
I’ll post again when these eggs finish incubating in about 3 weeks. I’m not expecting a particularly high hatch rate, as my hens are 4-5 years old now and fertility definitely drops off with age. Still, if I get 2 or 3 females out of the exercise, I’ll be happy. I can then breed from them next year, and get better hatch rates.